
Civil 3D, road design, 2 lesson
In the previous post We saw how to import dots, now we will see how to filter them to have a better notion of what we have. The points we have have the following attributes:
FENCE, RUNNER, GAP
Then the rest have nothing, so we will assume that it is the natural terrain and there are also the points of the central axis that are indicated with stations 0 + 000 0 + 10, 0 + 20 ... until reaching 0 + 650
Customize the siege points
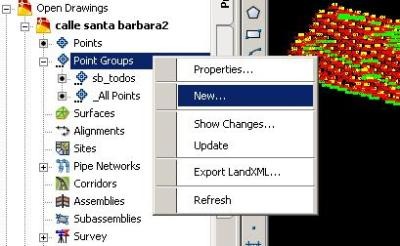
What we want is to be able to visualize the type of points according to their attributes of the table, so in the group of points we make right button and select "New".
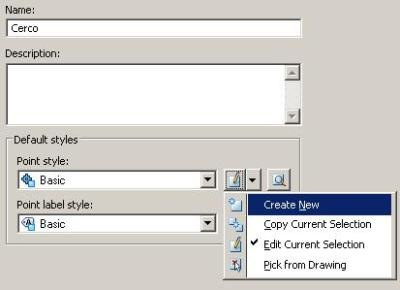
Then we will call it "Siege" and edit the point style properties by creating a new style by setting the following:
- In "Information" we will call "Siege"
- In "Marker" we will choose an X
- In "Display" we will change the color to orange
- Then we do "Accept"
We do the same with the label (point label style), only in this case we want the text not to be visible and for this:
- In "Information" we call "Enclosure label"
- In "Layout" we choose "point number", "Point Description" and "Point elevation" false. The color could be changed right there.
- We accept
Now to ask that this style happen to the points of the fence we select in the tab "Include"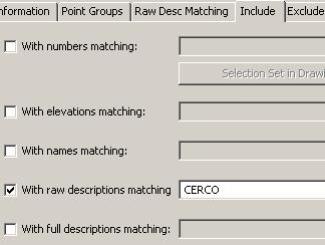 That the text contains the word "CERCO", then we choose "apply" and verify in the tab "Point list" that all points contain that description.
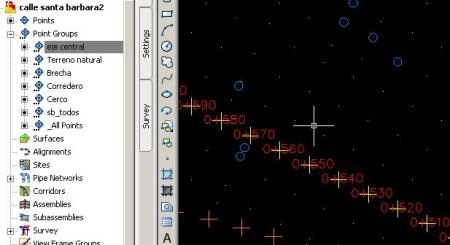
Then we do OK and we will see that all the points of the fence have the X orange color as we have defined it.

The points of the Sliding
We will do the same with the attribute "CORREDERO", in this case I will give you a blue color wheel, and I will also hide the names, elevations and number.
To display the change we regenerate with "re" and "enter".

Breakpoints
If the previous step cost you, now you have to try to recover terrain, it is the same initial procedure, creating a particular style for each type of points.
In the case of the Gap I will use green color, as a symbol a square and without descriptions. Blocks could well be used for this, but it's not my topic of discussion for today.
The points of the natural terrain.
For this, we will make a special selection, in this case not in "include" but in "exclude", placing the following:
RUNNER, GAP, FENCE, 0 + *
What it means is that you go all the points that do not contain any description like that, notice that the last one is explained in the next step.
At this point the work should look like this:

The points of the central axis
In this case, what we do is an "include", putting 0 + *
Which implies that all stations that have zero, plus sign and any other character will be selected. And to this we will give a symbol of more, we will leave visible only the station and the elevation.

I understand that customizing the latter should have cost you, but it is the way to test, to be changing properties to know what is changing. Finally it should look like this:

You can ignore this, but I anticipate that it will cost you later. Here you can download the file to the advance it leads. As you can see, you can already differentiate the different capture classes of the total station.


No need to thank Paul, the idea is that sharing knowledge helps us to grow and research more.
VERY GOOD TUTORIAL YOU ARE A SUPER TEACHER, THANK YOU FOR THE CONTRIBUTION OF GREAT HELP FOLLOW ON LUCK AND GOD BLESS YOU.
Very very very good, I really do not know this often, so simple with lots of didactics.
Very good your explanation, keep going companion ,,,,
Interesting the Civil 3d lessons regarding road. Thank you very much for your contribution will be useful.
To order friend
Big Teacher a full class of CIVIL 3D, maybe someone else study the excel template and can make contributions